

The Ultimate Guide to Framing Photos and Creating Wall Art for your Home

How to Frame Prints and Wall Art - The Ultimate Guide to Framing Photos at Home.
I often get asked about how to best frame The prints I sell. While some customers might want a professional to take care of this for them - it can be more affordable and bring that sense of achievement in doing it yourself.
There are many different sizes that photographs can be printed in and most places that you buy picture frames will offer a large range to fit different sized pictures. in fact in my studio at present, I currently have around 100 picture frames covering around 12 sizes of art prints.
This means that picking up picture frames for your photographs is probably not going to be an issue because you should be able to find your correct size in the many ranges available, whether you're after extra large framed photographs or just small pieces for the mantel piece.

A bit about aspect ratios - if printing your own images!
Most pictures come in a set aspect ratio and you will need to work out how well it will frame or how to crop your image to change it, this will allow your given print to fit its mount or frame.
For instance a 10"x12" print is at a 6:5 ratio whilst a 8"x12" is at 3:2 at Sebastien Coell Photography I tend to sell close to the 3:2 ratio as this is what my camera natively captures. Allowing me to show the full captured scene without cropping.
In other words unless you want a specific sized frame try and pick a frame or frame and mount combination that works well with the image you have, getting this correct is one of the important factors to creating that wall art for your space or gallery wall.

Selecting your Frame Size!
Once you know the size of your art print, look for the right frame either at that size or larger with a mount inside that will fit your print. Mounts give a more classical vibe and instantly make the overall finished article feel more substantial and alluring.
The addition of a mount also helps to fill wall space since the frame ends up bigger on the wall, it can often make your print pop and stand out and help to fill in that blank space you can get a good idea of filling blank spaces and how to hang art by visiting your local art gallery and studying the gallery walls.
What about not using a mount, its good to go mount less if your looking for a more contemporary feel, poster prints often look good without mounts, contrastey black and white's also can look good with the appropriate frame without a mount.
Just be sure that if your going mount-less you don't print in full gloss as that will cause issue where the print touches the glass.

An example of a specific size
If for instance you were to purchase one of our 8"x12" prints, you would want to look at frames that are either 8"x12" (20x30cm) or buy a frame with a mount included that will fit your 8"x12" images.
For instance a 12"x16" or 16"x20" frame with a 8"x12" mount aperture would work well for your print.
So essentially use a mount to give that professional look, whilst creating the flexibility of filling that extra space on your wall whilst enhancing your image.
How to Frame your print!
Step 1
To begin the framing process and once you have picked your perfect frame, a photo mount and your favourite print or wall art. You can begin the framing process.
For those who are on a budget, you can use masking tape or some other decorative tape such as washi tape - but we recommend that if you're serious about your work and want it to look more professional then you go with framers tape.
Framing tape is designed to not bleed through to your art, not damage the print and allow for some flexibility and movement. So we would recommend investing in some if your planning on framing a valuable picture.
Step 2
Remove any packaging from your frame and take off the backing board by pulling on the metal clasps.
Take out anything behind the backing board, like the mount or the paper that comes with the frame. You should now just have the frame with its glass or acrylic pane.
If your using glass
Then clean the glass with a soft cloth and even use a small hoover to get all of the little bits of dust off the glass.
If your using acrylic
Take the protective film of the acrylic and turn the acrylic over, then leave the second protective film on till the last moment - This is because acrylic is very static when you first pull the film off and will pick up dust like no tomorrow. It also scratches very easily so you don't want to be cleaning it unless you have to.
Step 3
Covering the table with a clean, plain white piece of paper, take your mount and place it face down onto the table. Next, lay your printed design over the aperture of the mount card so that they are also facing downwards.
Use tape to make small cuts at each corner to hold everything in place vertically. This is a pretty tentative step because if you've placed your print straight then there's no need for any corrections! But if you think it might be a little off then simply move the card around to get it just how you like it.
When you're happy with the placement of your print and mount, cut long strips of framing tape and tape along the edges and make sure that it doesn't extend past the edge of the print and mount.
Make sure the tape is pressed against the print and mount nicely using a rolling motion to help stop the print from rolling up.
Replace the backing board and well done you have just framed your print correctly.
The anatomy of framing
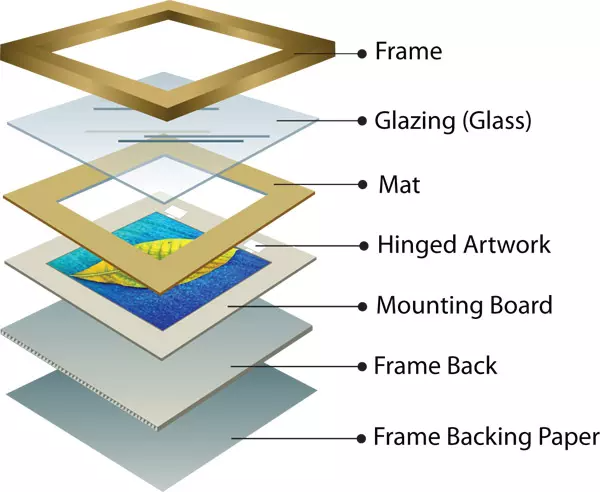
If you are cutting your own mounting board
It's alway easier to get pre-cut mounting / matt board, however if you have some uncut mounting board already or have an odd size to deal with, cutting your own might be the better option
The Tools you might need
Apart from the essential materials for framing your photos, like a frame, a backing board, mat board and acid-free tape as mentioned above, a cutting tool like the Logan Compact Elite Cutter is also a good idea when it comes to cutting mount board. This cutter is particularly effective for creating precise cuts on both backing and mat boards, making it an invaluable tool for any home-framing project.
For those on a budget a straight edge or a combination square might work.
Measuring and Cutting the Backing Board
Start with your frame and measure its dimensions. Use these measurements to cut a backing board that fits snugly inside the frame. Foam backing boards with a smooth finish work well for this purpose. A tool like the Logan cutter simplifies this step, allowing you to create perfectly sized pieces quickly and accurately. Once the first backing board is cut, you can use it as a template for additional frames if you’re working on multiple images.
Preparing the Mat Board
Matboards not only add a professional look to your framed photos but also protect them by keeping the photo from directly touching the frame’s glass. Crescent mat boards, known for their high quality, come in various colours; a crisp white shade with a slight texture is a versatile choice for most images.
Measure your mat board to match the dimensions of the backing board. The same cutting tool can ensure the edges are perfectly straight. For an elegant touch, create a 45-degree bevelled edge for the inner cut that frames your image. This requires a separate cutter attachment but elevates the presentation of your photograph.
Determining the Perfect Image Placement
Before cutting the mat board’s opening, measure your photograph to determine how much of the image you want visible. Some people prefer the mat board’s bevelled edge to meet the image directly, while others leave a small paper border visible. Leaving a 5 to 10-millimetre border around the image is ideal for showcasing the paper’s texture or adding a signature and title beneath the image. For a cohesive look, ensure all your pictures in a set—such as a triptych—share the exact dimensions and placement style.
Creating the Mat Board Opening
With your measurements ready, mark the mat board’s backside to outline the opening. A little math is required to centre the opening horizontally and vertically. Having equal spacing on the sides and top while leaving more space at the bottom creates a balanced composition and gives the photo a “lifted” appearance. Carefully cut the opening with a bevelled-edge cutter to achieve clean, professional results.
Mounting the Image
Once the mat board is ready, it’s time to mount the photograph. Use acid-free tape to secure the photo to the backing board. Acid-free tape ensures your image won’t degrade over time due to chemical reactions. To make adjustments or replace the image later, tape the mat board to the backing board along one edge, creating a hinge. This hinge lets you lift the mat board, position the photo, and tape it without hassle.
Final Assembly
Place the assembled mat and backing board securely in your frame with the photo. Before sealing the frame, insert any leftover mat board or foam pieces as dust barriers. These filters help prevent debris from entering the frame and protect the photograph over time. Use tape to secure the fillers before closing the frame.
For frames, aluminium designs are a sleek and modern choice. They’re lightweight, durable, and complement most interior styles. Once everything is assembled, clean the glass, and you’re ready to display your framed photograph.
The Beauty of Framed Memories
Framing your photos is about more than just preserving memories; it’s a way to elevate them into artwork. Whether creating a gallery wall in your home or preparing a unique gift for someone, the effort you put into framing will always shine through. This guide ensures that your framed photos look polished and professional, reflecting your invested time and care.
A Few Final Tips
To maintain the integrity of your framed photos, hang them away from direct sunlight and humidity. Regularly clean the frame and glass to keep your images looking pristine. If you’re framing images for clients or as gifts, consider adding a signature and date beneath the image for a personalized touch.
Investing in tools like the Logan Compact Elite Cutter simplifies the process, enabling you to create beautiful framed works with precision. By following this guide, you’ll master the art of framing and enjoy the satisfaction of proudly displaying your photographs.
Fancy one of our Photographic Prints?
Why your here, why not check out our prints we have for sale at Sebastien Coell Photography, We can even frame them for you too save all the hassle of doing it yourself.
We have a range of landscape art from the UK and Europe, such as our Scandinavian collection below and we can frames these for you using our natural wood frames or black frames and white frames in a range of styles from our fine art aluminium frames to our eco friendly mdf frames.

Hanging your print on your wall
When choosing where you want to hang your wall art, keep sunlight in mind. Most prints and materials in general don't have very good uv protection and the chemicals used in the ink during printing can interact with air and light, causing a photo fade, reducing the contrast in the print and ultimately destroying your original artwork. Using acid free paper can help improve the longevity of your print but it is still recommend to keep them away from bright direct sunlight.
To prevent this do not hang your picture frames in direct sunlight or on walls facing east or west. If it is vital that your prints will come into contact with direct sunlight try using a framed with uv protection tinted glass.
Also pay attention to what type of print finish you use, glossy prints can pick up a lot of reflections, which means a brightly lit room or strong sunlight and lots windows can make these hard to view, in this situation a matt or lustre print might be a better solution.
Where to purchase your frames.
There is practically an endless supply of frames on the internet these days and even several high street shops and chains that stock a wide array of frames for you to purchase making it a breeze when it comes to framing art and creating that perfect wall art for your home.
If your stuck on places to buy your photographic frames have a look at the places below to see the photo frames they have for sale.
Frames Online
You probably won't find a better supply of frames than Amazon you can see classic designs like the Hampton Frame (Amazon Referral Link)


habitat.co.uk
photoframesandart.com
eframe.co.uk
Frames from the high-street
John Lewis
The Range
Dunelm
Ikea
Wilko
When it comes to framing art its a good idea to try and think of the overall theme to the room, choosing matching frames often works well especially if your creating a gallery wall in your home.
Even thinking about print styles or whether your going for bright prints or dark more fine art style can effect the overall look especially on a gallery wall.
We hope you found this guide useful if you have any tips on how to frame your photos, why not let us know in the Comments box below!
More of our guides on prints and photography
Photographic Frames - Acrylic Plexiglas vs Glass - Which is the Best?

Glass or Acrylic Plexiglas? The differences and which is right for you? One belief with Framed Photography is the revelation that Plexiglas
Finish Type's in Photography - Which one is Best?

Finish Type's in Photography - Which one is Best? GLOSS, MATTE or LUSTRE, How to make the right decision.
How to Choose Wall Art to Bring Your Home to Life

5 Factors To Consider When Choosing Wall Art to Bring Your Walls to Life! and Tell Your Story | You may choose the best paint, rugs, and furniture for your
home and still find it lacking in warmth, and expression. | This guide will show you how to get the best from your Wall Art Prints
See our Complete Wall Art Guide
Meet the Author:
I am a UK based landscape photographer, who enjoys travel, hiking, rugby and photographing the beautiful world in which we live in, I see photography as a creative expression upon visiting beautiful places. Each picture often tells a story.
Thank you for reading this article, please feel to share it with your friends and please check out all my photography - and Home Decor Wall Art for Sale
Thanks

Note the two links to the frames in the article are amazon referral links and As an Amazon Associate I earn from qualifying purchases. Note this does not change the fee you have to pay and does not affect the price for the frames at all.
See more of our Blogs
-
How to Choose Wall Art to Bring Your Home to Life
5 Factors to Consider when Choosing Wall Art for your Home to bring your walls to life and tell your story You may ...
-

A Photographer’s Guide to Lake Bled and Rovinj: Capturing the Charm of Slovenia and Croatia
A Photographer’s Guide to Lake Bled and Rovinj: Capturing the Charm of Slovenia and Croatia Embarking on a journey ...
-
A Photographer’s Guide to Trevose Head Lighthouse: Capturing Cornwall’s Coastal Beauty
A Photographer’s Guide to Trevose Head Lighthouse: Capturing Cornwall’s Coastal Beauty Nestled on Cornwall’s rugged...


